Windows XP Update
Windows Update for Windows XP
The Windows Update utility is used to keep your Windows computer up-to-date. We highly recommend that you run Windows Update and install any Critical Updates. These updates will close security holes in your computer and hopefully prevent you from being hacked or infected with viruses.
This guide is optimized to be used with Windows XP running Service Pack 2 (SP2) or Service Pack 3 (SP3).
You must be logged on to Windows by using a computer administrator account to run Windows update.
Before start windows update is recomemded to close all aplications.
To use this Windows Updatee, you must be running Microsoft Internet Explorer 6 or later, other browsers doesn´t work.
Important: EnableWindows XP's System Restore
You can see instructions in the end of this tutorial.
Manually starting with Windows Update
- Click the Start button, and select Windows Update.

- If you see a message like the figure bellows please click in "Download anda Install Now".

- Click the Express button, to get high-priority updates (recommended).
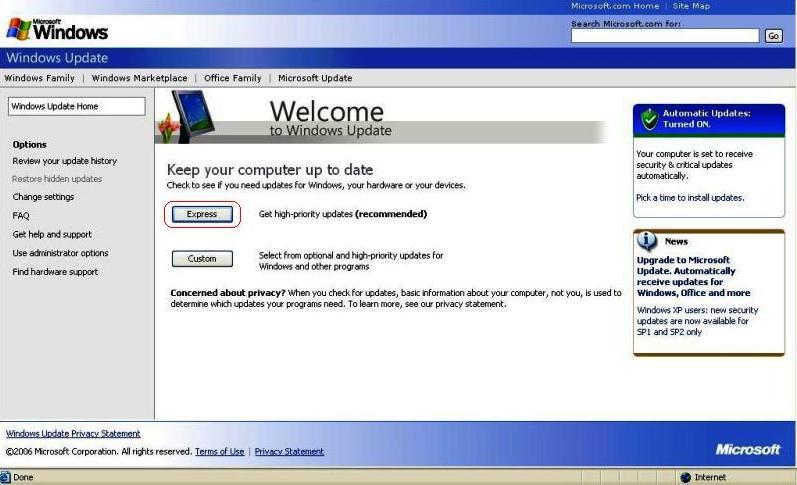

- Click Install Updates if you are prompted to install high priority Updates.
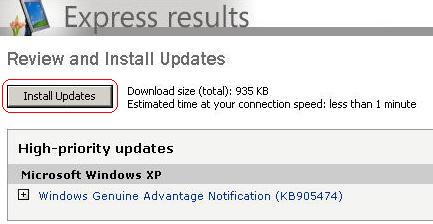
- When installation is complete, if one of the followin images appears click Restart Now.
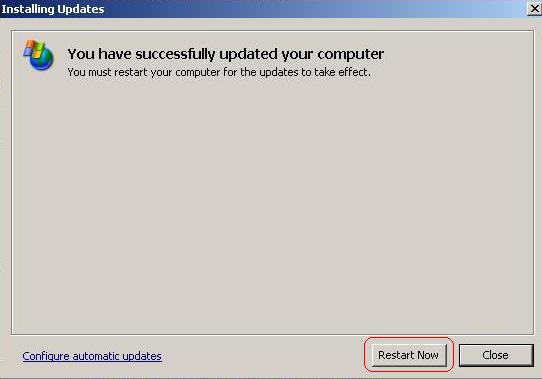
or

- There may be more critical or high priority updates that need to be installed after your computer restarts. Repeat the the sames steps.
If you choose in windows update the Custom option, then it´s possible to install "Optional software updates" and "Optional hardware updates" (this last option is only recommended for experts) , beyond "high-priority" updates.
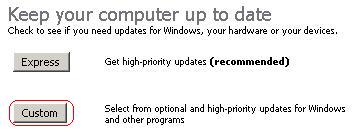
Keep current effortlessly using Automatic Updates
The most reliable way to get updates from Microsoft is to have the updates delivered automatically to your computer using Automatic Updates.
Automatic Updates ![]() connect to the Internet and scan your computer for updates, Automatic Updates automatically keeps your computer current. Instead of giving you a list of updates for your computer, Automatic Updates can download and install them at your convenience, like the picture bellows shows.
connect to the Internet and scan your computer for updates, Automatic Updates automatically keeps your computer current. Instead of giving you a list of updates for your computer, Automatic Updates can download and install them at your convenience, like the picture bellows shows.

How To Configure Automatic Updates in Windows XP
Turn On and Use Automatic Updates
Click Start, click Control Panel ![]() , click finaly in System icon
, click finaly in System icon ![]() and go to Automatic Updates tab.
and go to Automatic Updates tab.
Select one of the following options. We recommend that you select the option "Automatic (recommended)".
- This option automatically download recommended updates for my computer and install them.
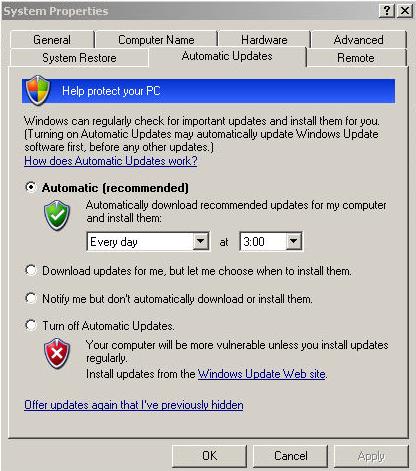
Click OK button.
If you click this setting, click to select the day and time for scheduled updates to occur. You can schedule Automatic Updates for any time of day. Remember, your computer must be on at the scheduled time for updates to be installed. After you set this option, Windows recognizes when you are online and uses your Internet connection to find updates on the Windows Update Web site or on the Microsoft Update Web site that apply to your computer. Updates are downloaded automatically in the background, and you are not notified or interrupted during this process. An icon appears in the notification area of your taskbar when the updates are being downloaded. You can point to the icon to view the download status. To pause or to resume the download, right-click the icon, and then click Pause or Resume. When the download is completed, another message appears in the notification area so that you can review the updates that are scheduled for installation. If you choose not to install at that time, Windows starts the installation on your set schedule.
For more information about how to schedule Automatic Updates, click the following article number to view the article in the Microsoft Knowledge Base:
327838 (http://support.microsoft.com/kb/327838/) How to schedule automatic updates in Windows XP, Windows 2000, or Windows Server 2003
Windows Install Updates and Shutdown Option
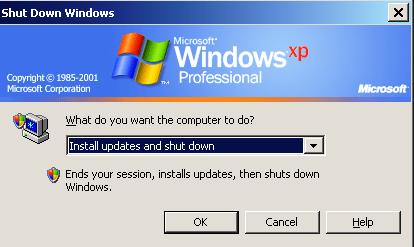
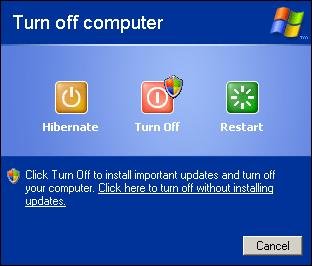
The Install Updates and Shutdown option simplifies the management of many clients running Automatic Updates. This option provides an alternative to installing updates in response to user notification messages and provides a method to install updates at a time when the computer is not being used for other activities.
In computers running Windows XP with SP2 or SP3, a new Install Updates and Shutdown option is displayed in the Shut Down Windows and Turn Off Computer dialog boxes. When updates have been downloaded and are ready to install, Windows shows the new Install Updates and Shutdown option as the default choice and marks it with the Windows Security shield, which indicates that this is a security recommendation. This option provides ease of management for clients configured to run Automatic Updates. See figures below.
How to turn on and turn off System Restore in Windows XP
By using the System Restore feature, a computer system can be restored (rolled back) to a time before certain events occurred. For example, the computer may be restored to a time before specific software or hardware installations. System Restore monitors changes to the computer and to some program files, and automatically creates restore points. You can also create your own restore points whenever you want to.
By default, System Restore is turned on in Windows XP. It is a powerful tool that generally should not be turned off.
Manual steps to turn on or turn off System Restore
Manual steps to turn off System Restore
To manually turn off System Restore, follow these steps: 1. Click Start, right-click My Computer, and then click Properties.
2. Click the System Restore tab.
3. Click to select the Turn off System Restore check box (or the Turn off System Restore on all drives check box), and then click OK.
4. Click Yes when you receive the prompt to the turn off System Restore.
Manual steps to turn on System Restore
To turn on System Restore, follow these steps: 1. Click Start, right-click My Computer, and then click Properties.
2. Click the System Restore tab.
3. Click to clear the Turn off System Restore check box (or the Turn off System Restore on all drives check box), and then click OK.

